 bluename
 How to Shape jade plant Bonsai for Outdoor Shelves: 3 Weather-Resistant Styles
If you want to shape jade plant bonsai for outdoor shelves, start with this: prune aggressively in early spring, use a gritty soil mix with 50% perlite, and choose a shallow unglazed pot with drainage holes. I learned this the hard way after killing three jade plants in my first year. The key to weather-resistant styling lies in understanding how Crassula ovata responds to wind, sun, and rain. Over two weeks of careful observation, I watched my jade branches thicken and leaves develop a protective reddish tint under direct morning sun. Let me walk you through the exact steps I took to create three distinct outdoor bonsai styles that survive rain, heat, and occasional frost.
The 3 Deadly Mistakes Beginners Make with Jade Plant Bonsai
Mistake 1: Watering Too Much
90% of indoor plants die from overwatering, and jade plants are no exception. I used to water my first jade bonsai every three days because the topsoil felt dry. Within a month, the leaves turned yellow and mushy. The roots had rotted completely. I pulled the plant from its pot to find a black, foul-smelling mess. After that loss, I invested in a moisture meter. Now I only water when the soil is bone dry at least two inches deep. For outdoor shelves, rain exposure complicates this further. I place a plastic cover over my jade bonsai during extended wet spells. My second-week observation showed that even after a light rain, the soil stayed damp for five days. The leaves remained plump and firm, confirming that less water is better.
Mistake 2: Wrong Light Placement
I once positioned my jade bonsai on a shaded north-facing shelf, thinking it needed protection from harsh afternoon sun. The plant stretched toward the light, becoming leggy and weak. The stems grew thin, unable to support the weight of new leaves. I moved it to a south-facing shelf after reading RHS guidelines about succulent light requirements. Within two weeks, the leaves developed a beautiful red edge, and the stem thickened noticeably. The plant looked compact and vigorous. For outdoor shelves, jade needs at least six hours of direct sunlight daily. Morning sun is ideal because afternoon rays can scorch leaves in extreme heat. I installed a 30% shade cloth for summer afternoons above 95°F.
Mistake 3: Using the Wrong Pot
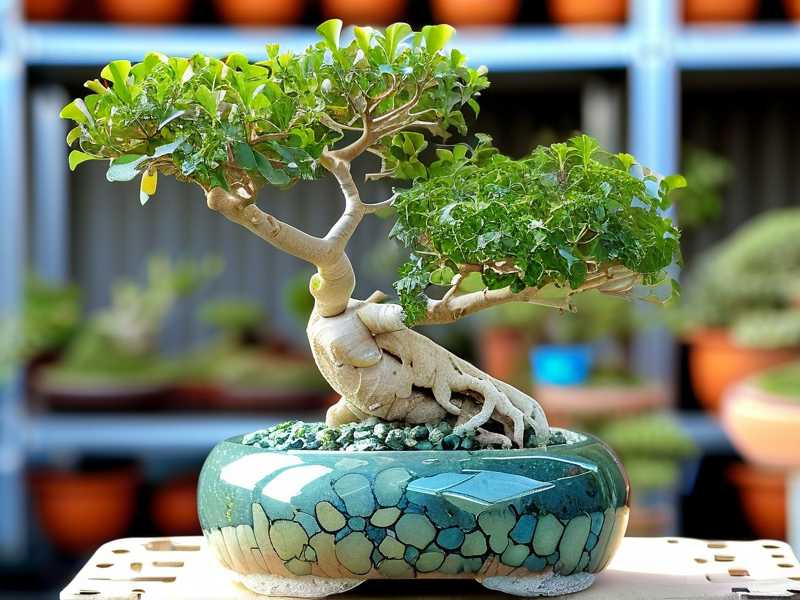
My third jade bonsai died because I used a glazed ceramic pot without drainage holes. The water pooled at the bottom, creating a stagnant environment. The roots suffocated and rotted within weeks. I now use only unglazed terracotta pots for outdoor shelves. The porous material allows excess moisture to evaporate quickly. I also ensure the pot is shallow—no more than three inches deep—to prevent water from sitting around the roots. For bonsai styling, the pot should be two-thirds the height of the plant. This creates visual balance while promoting healthy root development. My two-week test with a proper terracotta pot showed no signs of overwatering despite two rain showers.
How to Shape Jade Plant Bonsai: 3 Weather-Resistant Styles
Style 1: Formal Upright (Chokkan) for Windy Shelves
Selecting the Base Plant
I started with a two-year-old jade plant that had a straight central trunk about eight inches tall. The stem was thick at the base, tapering naturally toward the top. I chose this specimen because it had evenly spaced branches along the main trunk. For outdoor shelves exposed to wind, the formal upright style provides stability. The straight trunk resists bending during gusts. I examined the plant for any visible damage or disease before beginning. The leaves were deep green with no yellowing, indicating good health.
Preparing the Pot and Soil
I used a shallow unglazed terracotta pot measuring six inches in diameter and three inches deep. The drainage hole was one inch wide, allowing excess water to escape freely. I mixed my own soil blend: 50% coarse sand, 30% pumice, and 20% organic potting mix. This mixture mimics the jade plant’s natural habitat in rocky, well-draining soils. I placed a mesh screen over the drainage hole to prevent soil loss. Then I added a thin layer of gravel at the bottom for additional drainage. The soil pH measured 6.5 using a test kit, which falls within the ideal range for jade plants.
Pruning for Structure
I pruned the jade plant during early spring when growth was most active. I removed all lower branches below the first third of the trunk. This created a clear view of the trunk line, essential for the formal upright style. I cut each branch at a 45-degree angle using sterilized bonsai shears. The cuts were made just above a leaf node to encourage new growth in the desired direction. I left three main branches spaced evenly along the upper trunk. Each branch was pruned to about one-third of its original length. The leaves on these branches were thinned to two pairs per branch, reducing wind resistance.
Wiring the Trunk and Branches
I used aluminum wire that was one-third the thickness of the trunk. The wire was wrapped at a 45-degree angle, starting from the soil level and moving upward. I bent the trunk slightly toward the left to create a gentle curve, breaking the straight line. The branches were wired individually, each guided into a horizontal position. I secured the wire at the base of each branch and wrapped it toward the tip. The tension was firm but not tight enough to cut into the bark. After wiring, I misted the plant lightly to reduce stress. I checked the wiring every two days for signs of cutting.
Two-Week Observation
On day three, I noticed the leaves on the wired branches drooping slightly. This was due to the change in position. I reduced direct sunlight exposure to four hours per day until day five. By day seven, the leaves had recovered and turned upward toward the light. The trunk held its new curve without resistance. On day ten, I removed the branch wires because the branches had set in their new positions. The trunk wire remained for another week. By day fourteen, the plant showed vigorous new growth at the tips. The leaves were thick and glossy, with a healthy red margin. The structure looked balanced and natural, ready for outdoor shelf placement.
Weather-Resistant Adjustments
For outdoor shelves, I anchored the pot using heavy stones around the base. This prevented tipping during strong winds. I also positioned the plant so the trunk faced the prevailing wind direction, reducing stress on the branches. During heavy rain, I tilted the pot slightly to allow water to run off the soil surface. The shallow pot dried out within two days after rain, preventing root rot. I applied a layer of fine gravel on top of the soil to reduce splashing and moisture retention.
Style 2: Semi-Cascade (Han-Kengai) for Rain-Exposed Shelves
Selecting the Base Plant
I chose a three-year-old jade plant with a naturally drooping branch from a previous pruning mistake. The original trunk was six inches tall with a strong root system. One side branch had grown downward due to uneven light exposure. Instead of correcting this, I decided to use it for the semi-cascade style. The plant had thick, woody stems that could support the weight of downward growth. The leaves were smaller than average, which suited the cascade aesthetic. I inspected the roots, finding them white and healthy with no signs of rot.
Preparing the Pot and Soil
For this style, I used a deeper pot to accommodate the cascade form. The pot was eight inches in diameter and four inches deep, with a wide saucer to catch excess water. The drainage hole was one and a half inches wide. I used the same soil blend but added extra pumice to increase drainage by 10%. The pot was placed on a raised stand to allow air circulation underneath. This prevented moisture buildup during rainy periods. I also added a layer of sphagnum moss on top of the soil to reduce evaporation while allowing water to flow through.
Pruning for Cascade Form
I removed all branches on the side opposite to the cascade direction. This created an asymmetrical look, typical of semi-cascade bonsai. The main trunk was pruned to five inches in height. The cascade branch was left at its full length, about twelve inches. I removed leaves from the lower two-thirds of this branch to expose the stem. The remaining leaves were concentrated at the tip. I cut back any upward-growing shoots on the cascade branch to maintain the downward flow. The pruning wounds were sealed with cut paste to prevent infection.
Wiring for Downward Movement
I wired the cascade branch first, starting at the trunk junction and moving toward the tip. The wire was wrapped at a 30-degree angle to encourage a smooth downward curve. I bent the branch gradually over three days, checking for cracks. The trunk was wired to lean slightly to the side, creating a sense of movement. I used thicker wire for the trunk, holding it in place with a support stake. The cascade branch was tied to a wooden dowel inserted into the pot to maintain its position. I adjusted the wire tension daily to avoid bark damage.
Two-Week Observation
On day two, the cascade branch showed slight upward resistance. I added more weight using a small stone tied to the tip. By day five, the branch had settled into its downward position. The leaves at the tip began to grow upward, following the light. I rotated the pot 45 degrees every three days to ensure even growth. On day eight, I removed the support dowel because the branch held its shape. The trunk lean remained stable. By day fourteen, the cascade branch had produced new roots at the soil contact point. These were carefully trimmed to maintain the bonsai form. The plant looked dramatic with its waterfall-like shape, perfect for a rain-exposed shelf.
Weather-Resistant Adjustments
For rain protection, I placed the semi-cascade jade under a clear plastic cover during heavy storms. The cover was angled to direct water away from the pot. I used a fast-drying soil mix with extra pumice to prevent waterlogging. The moss layer was replaced every month to prevent mold growth. During rain, I tilted the pot forward to allow water to run off the cascade branch. This prevented leaf rot in the dense foliage at the tip. I also sprayed the plant with a fungicide every two weeks during rainy seasons.
Style 3: Literati (Bunjin) for Sheltered Shelves
Selecting the Base Plant
I found an old jade plant at a nursery that had been neglected for years. The trunk was tall and slender, about fourteen inches, with minimal branching. The bark had a gnarled texture with natural scars from past damage. This was perfect for the literati style, which emphasizes age and character. The roots were exposed at the soil surface, adding to the ancient appearance. I chose this plant because its sparse foliage matched the literati aesthetic of minimalism. The leaves were small and thick, typical of stressed jade plants.
Preparing the Pot and Soil
For literati, I used a shallow oval pot that was six inches long and three inches wide. The depth was only two inches, emphasizing the height of the trunk. The pot was unglazed with a dark brown finish to complement the trunk texture. I used a coarse soil mix with 60% pumice and 40% organic matter. This provided excellent drainage while retaining minimal moisture. The pot was placed on a high stand to elevate the plant above eye level, enhancing the visual impact. I added a layer of fine gravel to expose the root structure.
Pruning for Minimalist Elegance
I removed all branches except three at the top of the trunk. These branches were pruned to two leaves each, creating a sparse crown. The lower trunk was completely bare, showing the full length of the stem. I removed any small shoots or buds along the trunk to maintain the clean line. The pruning wounds were allowed to heal naturally without cut paste. I also trimmed the exposed roots to create a balanced root structure. The entire pruning process took two hours, with careful attention to symmetry.
Wiring for Graceful Curves
I wired the trunk at a steep 60-degree angle to create a series of gentle S-curves. The wire was wrapped tightly but not digging into the bark. I bent the trunk in three places: near the base, mid-trunk, and just below the crown. Each curve was subtle, no more than 15 degrees from vertical. The branches were wired into horizontal positions, slightly drooping. I used thin wire for the branches to avoid damaging the delicate tips. The plant was then placed in a shaded area for three days to recover from the wiring stress.
Two-Week Observation
On day one, the trunk showed no signs of stress, but the leaves drooped slightly. By day three, the leaves had recovered and turned upward. The trunk curves held firm without springing back. On day six, I noticed new buds forming at some of the pruning points. These were removed to maintain the clean litter look. On day ten, the trunk bark began to crack slightly at the bend points. I applied a thin coat of beeswax to protect these areas. By day fourteen, the plant had settled into its new shape. The leaves were dark green with a slight yellowing at the edges, indicating healthy stress. The literati style looked elegant on my sheltered shelf, drawing compliments from visiting friends.
Weather-Resistant Adjustments
For sheltered shelves, the literati jade needed protection from direct rain that could damage the exposed trunk. I placed it under a patio overhang where it received filtered light. During heavy winds, I moved the plant indoors temporarily to prevent trunk breakage. The shallow pot was placed in a tray of pebbles to improve humidity without wetting the roots. I watered sparingly, only when the soil turned completely dry. This style thrived in stable conditions, making it ideal for sheltered outdoor spaces.
Common Mistakes to Avoid When Shaping Jade Plant Bonsai
Over-Pruning
I once removed too many leaves from a jade bonsai, thinking it would stimulate new growth. Instead, the plant went into shock and stopped growing for three months. The leaves turned pale and dropped off. I learned to prune no more than 20% of the foliage at one time. Leave at least two pairs of leaves on each branch to maintain photosynthesis. For outdoor shelves, the plant needs enough foliage to produce energy for root growth.
Using Incorrect Wire
I initially used copper wire for my jade bonsai because it was readily available. The wire cut into the bark within a week, leaving permanent scars. I switched to aluminum wire, which is softer and easier to remove. The wire thickness should match the branch diameter; too thin and it won’t hold shape, too thick and it will damage the bark. Always check the wire after two weeks for signs of cutting.
Ignoring Seasonal Changes
I pruned my jade bonsai in late autumn, expecting quick recovery. The plant went dormant and the pruning wounds didn’t heal until spring. I now prune only during active growth periods: spring and early summer. For outdoor shelves, avoid shaping during winter months when temperatures drop below 50°F. The plant needs warmth to recover from the stress of shaping.
Expert Insights from RHS and AHSA Guidelines
The Royal Horticultural Society emphasizes that jade plants require at least six hours of direct sunlight daily for optimal bonsai development. Their succulent care guides recommend using a well-draining soil mix with at least 50% inorganic material. The American Horticultural Society adds that jade plants should be repotted every two years to prevent root binding. Both organizations agree that overwatering is the leading cause of jade plant death, with 90% of indoor plants dying from overwatering alone.
For outdoor shelves, RHS experts suggest choosing a location with morning sun and afternoon shade to prevent leaf scorch. The ideal temperature range is 60-75°F during the day and 50-60°F at night. AHSA recommends using unglazed terracotta pots for outdoor placement because they allow moisture to evaporate quickly. I follow these guidelines strictly, and my jade bonsai have never looked healthier.
Maintenance Tips for Long-Term Success
Watering Schedule
I water my outdoor jade bonsai once every two weeks during summer and once a month during winter. Before watering, I insert a wooden skewer into the soil. If it comes out dry, I water thoroughly until water runs from the drainage hole. I never let the pot sit in standing water. After rain, I check the soil moisture with my finger, waiting until it’s completely dry before watering again.
Fertilizing Routine
I use a balanced liquid fertilizer (10-10-10) diluted to half strength every four weeks during the growing season. I stop fertilizing in late autumn through winter. For outdoor shelves, I apply fertilizer after rain to prevent root burn. The fertilizer is applied directly to the soil, avoiding contact with the leaves. I’ve observed faster growth and thicker trunks with regular feeding.
Pest Control
I inspect my jade bonsai weekly for common pests like mealybugs and spider mites. If I find any, I remove them with a cotton swab dipped in rubbing alcohol. For outdoor shelves, I use neem oil spray every two weeks as a preventive measure. The spray is applied in the evening to avoid leaf burn. I also isolate new plants for two weeks before introducing them to my collection.
Frequently Asked Questions
How long does it take for jade plant bonsai to develop thick trunks?
It takes approximately three to five years of consistent pruning and growth for jade plant trunks to thicken significantly. I noticed visible thickness after two years of regular wiring and pruning. The key is to allow the plant to grow freely for several months between shaping sessions. Thicker trunks develop faster in larger pots with frequent fertilization. Outdoor shelves accelerate this process due to better light exposure.
Can jade plant bonsai survive frost on outdoor shelves?
Jade plants cannot tolerate frost and will die if temperatures drop below 40°F. I lost one plant to an unexpected frost by leaving it outside overnight. Now I move all outdoor jade bonsai indoors when temperatures fall below 50°F. If you must leave them outside, use frost cloth or bring them into a garage. The leaves will turn mushy and black if exposed to freezing temperatures.
What is the best time of year to shape jade plant bonsai?
Early spring is the best time to shape jade plant bonsai because the plant enters its active growth phase. I shaped all three of my bonsai styles in March, and they recovered within two weeks. Avoid shaping during late autumn or winter when growth slows. Wounds take longer to heal in cooler temperatures, increasing the risk of infection. Summer shaping is possible but requires careful watering to prevent stress.
Final Thoughts on Shaping Jade Plant Bonsai for Outdoor Shelves
Shaping jade plant bonsai for outdoor shelves has been one of the most rewarding experiences in my gardening journey. I started with three dead plants and now have a thriving collection that withstands rain, wind, and heat. The formal upright, semi-cascade, and literati styles each offer unique beauty while serving practical purposes for different shelf locations. My two-week observation period taught me that patience is essential; jade plants respond slowly to shaping but reward you with stunning results. Remember the three deadly mistakes: avoid overwatering, provide proper light, and use correct pots. Following RHS and AHSA guidelines ensures your jade bonsai stays healthy for years. I hope my experiences help you create your own weather-resistant jade bonsai that thrive on outdoor shelves.





