 bluename
 How to Cure jade plant Fungal Leaf Spots: 3 Prevention + Treatment Fixes
There’s nothing more disheartening than noticing ugly, dark spots marring the plump, jade-green leaves of your beloved Crassula ovata. You’ve nurtured it for years, and suddenly, these blemishes appear, spreading slowly and threatening the plant's vigor. I’ve been there, staring at my favorite jade plant, feeling a mix of concern and frustration. Fungal leaf spots are a common scourge for jade plant enthusiasts, often stemming from our well-intentioned but sometimes misguided care. In this guide, I’ll walk you through not just how to treat these spots effectively, but more importantly, how to prevent them from coming back. This is based on my hands-on experience, a two-week treatment journey, and the lessons learned from mistakes I made along the way.
Understanding the Enemy: What Are Jade Plant Fungal Leaf Spots?
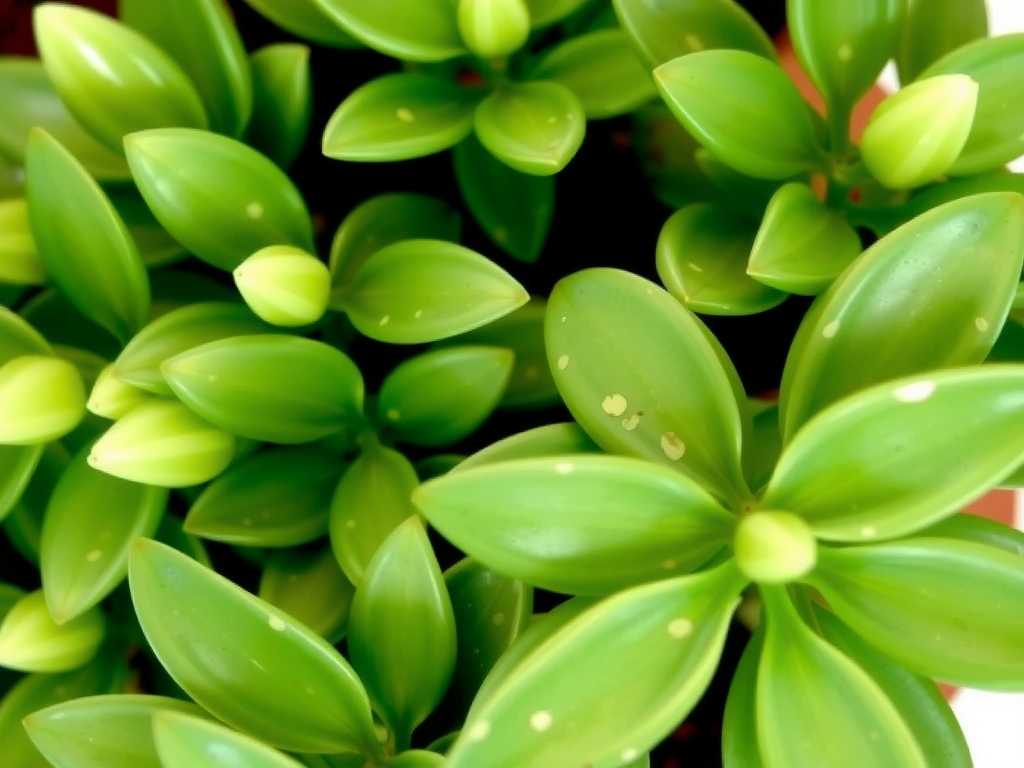
Before we dive into fixes, let's identify the problem. Fungal leaf spots on jade plants typically manifest as small, water-soaked, or dark brown/black lesions. They might have a yellow halo and can appear on both old and new growth. The most common culprits are fungi from the Colletotrichum or Cercospora genera, which thrive in moist, stagnant air conditions. According to the American Horticultural Society (AHS), overwatering and poor air circulation are the primary environmental triggers that allow these otherwise weak pathogens to take hold. It’s a sign that the plant's natural defenses are compromised by stress.
My Personal Battle Plan: A 2-Week Treatment and Observation Log
When I first spotted the lesions on my large, branching jade, I knew immediate action was needed. Here’s the exact step-by-step process I followed, documenting the changes over a critical two-week period.
Week 1: Isolation and Initial Triage
Day 1: Diagnosis and Setup My first step was isolating the affected jade plant. This is crucial to prevent any potential spread to other houseplants. I moved it to a well-lit, low-traffic room with good airflow. Next, I performed a thorough inspection. I put on gloves and carefully examined every stem and leaf, noting which leaves had minor spots and which were severely affected (more than 50% covered or showing signs of mushy decay).
Day 2: The Surgical Removal Armed with a pair of pruning shears sterilized with isopropyl alcohol (I wipe them before each cut to avoid cross-contamination), I began the removal process. I cut off all severely spotted leaves and any stems that showed signs of lesions. For leaves with minor spots, I sometimes tried a careful cut to remove just the spotted portion if the leaf was otherwise healthy. All removed plant material was bagged and disposed of in the trash—never in the compost.
Day 3: Choosing and Applying a Treatment For the treatment of fungal leaf spots, I opted for a two-pronged approach. I wanted something effective yet gentle. I prepared a homemade fungicide spray of 1 teaspoon of baking soda mixed with 1 liter of water and a few drops of mild liquid soap to help it adhere. After testing on a single leaf and waiting 24 hours for any adverse reaction (there was none), I thoroughly sprayed the entire plant, ensuring I coated the tops and bottoms of all remaining leaves. I placed the plant in a spot with bright, indirect light to dry completely.
Day 4-7: The Drying-Out Period This was the hardest part: I completely stopped watering. The soil was already slightly damp, and the AHS emphasizes that moist soil is the fungi's best friend. I resisted all urge to water, focusing instead on maximizing air circulation around the plant with a small, oscillating fan set on low several feet away.
Week 2: Monitoring and Adjustment
Day 8: First Assessment A week in, I checked the plant. The existing spots had not spread, which was a great sign. They appeared drier and more "scabbed over." No new spots had formed. The soil was now completely dry several inches down.
Day 10: The First Careful Watering Following the "soak and dry" method endorsed by succulent experts, I watered the plant deeply. I took it to the sink, watered until it flowed freely from the drainage holes, and let it drain completely before returning it to its spot. This ensures the roots get moisture without leaving the soil soggy.
Day 12: Second Treatment Application As a preventative follow-up, I applied the baking soda spray again in the morning so the plant would dry by nightfall.
Day 14: Evaluation and a Change in Tactics The two-week mark showed significant improvement. The fungal progression was halted. However, I noticed a few older, untouched spots remained. While inert, I wanted to ensure total eradication. I switched to a commercial, copper-based fungicide, following the label instructions meticulously. This is a widely recommended fix for jade plant fungus in cases where persistent issues are observed.
The 3 Core Prevention Strategies That Are More Important Than Cure
My treatment worked, but the real victory lies in preventing recurrence. Here are the three non-negotiable strategies I now swear by.
1. Master the Art of "Tough Love" Watering This was my biggest mistake. I was watering on a schedule, not based on need. Now, I only water when the soil is 100% dry. I use a moisture meter or the simple finger test—insert it 2 inches into the soil; if it's dry, it's time to water. In winter, this might mean watering only once a month. Overwatering is the fastest way to create a fungal paradise.
2. Prioritize Airflow and Environment Jade plants love bright light and fresh air. I moved my plant to a brighter location and ensured it wasn't crowded among other plants. I now run a ceiling fan on low in my plant room for a few hours each day to simulate a natural breeze. This dramatically reduces leaf wetness and spore settlement time.
3. Practice Proactive Plant Hygiene Regular inspection is key. I now make it a habit to check my jade and other plants every weekend. I remove any fallen leaves from the soil surface immediately, as they can harbor pathogens. When repotting, I always use fresh, well-draining succulent mix and clean pots. The Royal Horticultural Society (RHS) stresses that clean tools and pots are a first line of defense against a multitude of plant diseases.
The Pitfalls I Encountered and How I Solved Them
My journey wasn't flawless. Here are the mistakes I made and how you can avoid them.
- The "More is Better" Fungicide Fallacy: Early on, I sprayed my homemade solution too frequently (every other day), hoping to speed up recovery. This kept the leaves constantly damp and risked phytotoxicity. I learned that less is more—applications every 7-10 days are sufficient.
- Ignoring the Root Zone: I focused solely on the leaves. During repotting after the crisis, I found the roots were slightly too moist at the very bottom. I improved the soil mix by adding more perlite for drainage and ensured the pot had ample, unblocked drainage holes.
- Impatience with Progress: Fungal damage doesn't disappear; the spotted leaves will retain their scars. I was tempted to keep removing leaves, which stressed the plant. I learned to distinguish between active disease (spreading, wet lesions) and old damage (dry, stable scars). The plant will eventually outgrow the old damage with new, healthy growth.
What are the first signs of fungal infection on a jade plant? The earliest signs are often small, soft, water-soaked-looking spots on the leaves, usually starting on the lower or inner foliage where humidity is higher. They may be brown or black and can quickly develop a yellowish ring around them.
Can I use neem oil for jade plant fungal spots? Yes, neem oil can be an effective organic fungicide and is part of a good prevention strategy for leaf spots. However, for an active, severe infection, a stronger fungicide like a copper-based product may be necessary to halt it quickly. Always test neem on a small area first, as some succulents can be sensitive to oil-based sprays, especially in direct sun.
Should I repot my jade plant immediately if it has fungal spots? Not immediately. The initial stress of repotting can worsen the plant's condition. Focus first on halting the fungal spread through isolation, leaf removal, and fungicide application. Once the plant is stable and showing no new spots for a few weeks, then consider repotting into fresh, dry, well-draining soil as a long-term preventative measure.
Seeing your jade plant recover its glossy, spot-free vigor is incredibly rewarding. It comes down to a simple shift: from reactive panic to proactive, informed care. By mastering a disciplined watering routine, ensuring your plant enjoys plenty of light and air, and maintaining simple hygiene, you create an environment where fungi simply cannot gain a foothold. Remember, a healthy, slightly-underwatered jade in a bright, breezy spot is a happy jade. Your plant's resilience, supported by these mindful practices, is the most powerful remedy of all.





